
Heartstrings: a
Valentine's Craft
Today's snack: String cheese! Bend two pieces together in the shape
of a heart. Then eat this delicious, heart-healthy food.
----------------------------
Supplies:
Cardstock or other relatively heavy paper in a Valentine
color
Heart-shaped cookie cutter or other heart-shaped
object you can trace
Embroidery floss in a contrasting Valentine color
Large needle (embroidery or tapestry; available for
about $1 in the sewing department of a hobby store; if there are more than one
student doing this project, take turns!)
Thimble
Washcloth
Ruler
Scotch tape
Scissors
You
know about heartstrings: that's the expressive term for your deepest feelings
and strongest affections. You can play on your Valentine's heartstrings by
making a very special piece of string art.
All you need is a piece of cardstock or other heavy paper
in a pretty Valentine's Day color; some embroidery floss (entwined strands of
thread), perhaps in red or silver, and a large needle, such as an embroidery
needle or a tapestry needle.
You
should be able to purchase a big needle like that at a craft or sewing store
for less than a dollar or so. They should be available in plastic, if you're
concerned about safety.
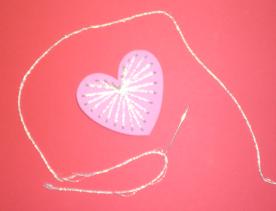
First, trace a heart on the cardstock using a heart
pattern such as a cookie cutter. Cut out the paper heart. It should lay flat,
with no folds. The smaller the heart, the less embroidery floss you will need,
but since it's inexpensive, that shouldn't matter.
Fold the washcloth into fourths and lay on the counter.
With the needle, poke holes around the outside edge of the heart. Start at the
top center, underneath where the two top curves meet, and poke the first hole.
Then poke the next hole at the bottom, just above the point. Now poke more
holes up the right side at even intervals, and repeat on the left side.
Depending on the size of the heart, you might have six holes per side, for a
total of 12 holes.
(Note: if your student is younger than 10 years old or
so, you might prefer punching holes around the edge of the heart with a paper
punch. Then it would be easy to get the needle through the much larger holes
the paper punch would make. But it's not as pretty.)
Also,
it can get tricky pushing the needle through the tiny holes in this project,
and older children and teenagers should take their time so that they don't rip
the paper.
It's
helpful to put a thimble on the finger you're using to push the needle through
the holes. Children sometimes are squeamish about the feel of the needle's blunt
end on their forefinger as they push. It can hurt a little!
Now thread your large needle and snip off the floss at
about 18 inches. Measure with the ruler to make sure you have enough floss.
Pull the needle through the hole at the bottom until the floss is almost
all the way through. Scotch-tape the last half-inch or so of it on the back so
that it stays snug.
Turn the heart back over, pick up the needle again, and
this time, pull the needle down into the hole at the top center of the heart, out of sight underneath the heart.
Pull the floss through. The heart should lay flat and not be pulled upwards by
the floss. If it does, you're holding the floss too tight.
Now, coming up from underneath the heart, this time pull
the needle up through the
hole immediately to the RIGHT of the
first hole on the bottom
of the heart. Pull the floss all the way through.
Then
pull the needle down through
the hole immediately to the LEFT of
the first hole at the top
of the heart.
See how you edge the needle around the outside edges of
the heart?
Work
your way all around the heart. If you run out of embroidery floss, tape a
half-inch or so of the end on the back, and re-thread another 18-inch length of
floss on your needle, pull it through the next hole, be careful to tape off the
end, and continue.
When you're done, snip off any remaining floss and tape
the last end.
Turn it back over to the front, think about who is going
to receive this special Valentine, and you'll probably hear Cupid singing that
old, old Valentine's song:
"Zing!
went the strings of my heart."